Building prompts
This page is about building prompts. Pieces of code that we can embed in a program for asking the user for input. If you want to use prompt_toolkit for building full screen terminal applications, it is probably still a good idea to read this first, before heading to the building full screen applications page.
Hello world
The following snippet is the most simple example, it uses the
prompt() function to asks the user for input
and returns the text. Just like (raw_)input.
from __future__ import unicode_literals
from prompt_toolkit import prompt

text = prompt('Give me some input: ')
print('You said: %s' % text)
What we get here is a simple prompt that supports the Emacs key bindings like
readline, but further nothing special. However,
prompt() has a lot of configuration options.
In the following sections, we will discover all these parameters.
Note
prompt_toolkit expects unicode strings everywhere. If you are using
Python 2, make sure that all strings which are passed to prompt_toolkit
are unicode strings (and not bytes). Either use
from __future__ import unicode_literals or explicitely put a small
'u' in front of every string.
Syntax highlighting
Adding syntax highlighting is as simple as adding a lexer. All of the Pygments lexers can be used after wrapping them in a
PygmentsLexer. It is also possible to
create a custom lexer by implementing the
Lexer abstract base class.
from pygments.lexers import HtmlLexer
from prompt_toolkit.shortcuts import prompt
from prompt_toolkit.layout.lexers import PygmentsLexer

text = prompt('Enter HTML', lexer=PygmentsLexer(HtmlLexer))
print('You said: %s' % text)
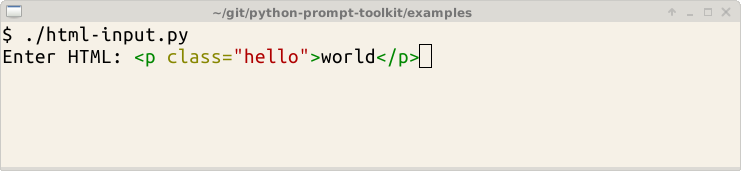
Colors
The colors for syntax highlighting are defined by a
Style instance. By default, a neutral built-in
style is used, but any style instance can be passed to the
prompt() function. A simple way to create a
style, is by using the style_from_dict
function:
from pygments.lexers import HtmlLexer
from prompt_toolkit.shortcuts import prompt
from prompt_toolkit.token import Token
from prompt_toolkit.styles import style_from_dict
from prompt_toolkit.layout.lexers import PygmentsLexer

our_style = style_from_dict({
    Token.Comment:   '#888888 bold',
    Token.Keyword:   '#ff88ff bold',
})

text = prompt('Enter HTML: ', lexer=PygmentsLexer(HtmlLexer),
              style=our_style)
The style dictionary is very similar to the Pygments styles dictionary,
with a few differences:
- The roman, sans, mono and border options are not ignored.
- The style has a few additions: blink, noblink, reverse and noreverse.
- Colors can be in the #ff0000 format, but they can be one of the built-in ANSI color names as well. In that case, they map directly to the 16 color palette of the terminal.
Using a Pygments style
All Pygments style classes can be used as well, when they are wrapped through
style_from_pygments().
Suppose we’d like to use a Pygments style, for instance
pygments.styles.tango.TangoStyle, that is possible like this:
Creating a custom style could be done like this:
from prompt_toolkit.shortcuts import prompt
from prompt_toolkit.styles import style_from_pygments
from prompt_toolkit.layout.lexers import PygmentsLexer

from pygments.styles.tango import TangoStyle
from pygments.token import Token
from pygments.lexers import HtmlLexer

our_style = style_from_pygments(TangoStyle, {
    Token.Comment:   '#888888 bold',
    Token.Keyword:   '#ff88ff bold',
})

text = prompt('Enter HTML: ', lexer=PygmentsLexer(HtmlLexer),
              style=our_style)
Coloring the prompt itself
It is possible to add some colors to the prompt itself. For this, we need a
get_prompt_tokens function. This function takes a
CommandLineInterface instance as input
(ignore that for now) and it should return a list of (Token, text) tuples.
Each token is a Pygments token and can be styled individually.
from prompt_toolkit.shortcuts import prompt
from prompt_toolkit.styles import style_from_dict

example_style = style_from_dict({
    # User input.
    Token:          '#ff0066',

    # Prompt.
    Token.Username: '#884444',
    Token.At:       '#00aa00',
    Token.Colon:    '#00aa00',
    Token.Pound:    '#00aa00',
    Token.Host:     '#000088 bg:#aaaaff',
    Token.Path:     '#884444 underline',
})

def get_prompt_tokens(cli):
    return [
        (Token.Username, 'john'),
        (Token.At,       '@'),
        (Token.Host,     'localhost'),
        (Token.Colon,    ':'),
        (Token.Path,     '/user/john'),
        (Token.Pound,    '# '),
    ]

text = prompt(get_prompt_tokens=get_prompt_tokens, style=example_style)
By default, colors are taking from the 256 color palette. If you want to have
24bit true color, this is possible by adding the true_color=True option to
the prompt function.
text = prompt(get_prompt_tokens=get_prompt_tokens, style=example_style,
              true_color=True)
Printing text (output) in color
Besides prompting for input, we often have to print some output in color. This
is simple with the print_tokens() function.
from prompt_toolkit.shortcuts import print_tokens
from prompt_toolkit.styles import style_from_dict
from pygments.token import Token

# Create a stylesheet.
style = style_from_dict({
    Token.Hello: '#ff0066',
    Token.World: '#44ff44 italic',
})

# Make a list of (Token, text) tuples.
tokens = [
    (Token.Hello, 'Hello '),
    (Token.World, 'World'),
    (Token, '\n'),
]

# Print the result.
print_tokens(tokens, style=style)
Autocompletion
Autocompletion can be added by passing a completer parameter. This should
be an instance of the Completer abstract
base class. WordCompleter is an example of a completer that implements that
interface.
from prompt_toolkit import prompt
from prompt_toolkit.contrib.completers import WordCompleter

html_completer = WordCompleter(['<html>', '<body>', '<head>', '<title>'])
text = prompt('Enter HTML: ', completer=html_completer)
print('You said: %s' % text)
WordCompleter is a simple completer that completes the last word before the
cursor with any of the given words.

A custom completer
For more complex examples, it makes sense to create a custom completer. For instance:
from prompt_toolkit import prompt
from prompt_toolkit.completion import Completer, Completion

class MyCustomCompleter(Completer):
    def get_completions(self, document, complete_event):
        yield Completion('completion', start_position=0)

text = prompt('> ', completer=MyCustomCompleter())
A Completer class has to implement a
generator named get_completions()
that takes a Document and yields the current
Completion instances. Each completion
contains a portion of text, and a position.
The position is used in for fixing text before the cursor. Pressing the tab key
could for instance turn parts of the input from lowercase to uppercase. This
makes sense for a case insensitive completer. Or in case of a fuzzy completion,
it could fix typos. When start_position is something negative, this amount
of characters will be deleted and replaced.
Input validation
A prompt can have a validator attached. This is some code that will check whether the given input is acceptable and it will only return it if that’s the case. Otherwise it will show an error message and move the cursor to a given possition.
A validator should implements the Validator
abstract base class. This requires only one method, named validate that
takes a Document as input and raises
ValidationError when the validation fails.
from prompt_toolkit.validation import Validator, ValidationError
from prompt_toolkit import prompt

class NumberValidator(Validator):
    def validate(self, document):
        text = document.text

        if text and not text.isdigit():
            i = 0

            # Get index of fist non numeric character.
            # We want to move the cursor here.
            for i, c in enumerate(text):
                if not c.isdigit():
                    break

            raise ValidationError(message='This input contains non-numeric characters',
                                  cursor_position=i)


number = int(prompt('Give a number: ', validator=NumberValidator()))
print('You said: %i' % number)
History
A History object keeps track of all the
previously entered strings. When nothing is passed into the
prompt() function, it will start with an empty
history each time again. Usually, however, for a REPL, you want to keep the
same history between several calls to
prompt(). This is possible by instantiating a
History object and passing that to each
prompt call.
from prompt_toolkit.history import InMemoryHistory
from prompt_toolkit import prompt

history = InMemoryHistory()

while True:
    prompt(history=history)
To persist a history to disk, use FileHistory
instead instead of InMemoryHistory.
Auto suggestion
Auto suggestion is a way to propose some input completions to the user like the fish shell.
Usually, the input is compared to the history and when there is another entry starting with the given text, the completion will be shown as gray text behind the current input. Pressing the right arrow → will insert this suggestion.
Note
When suggestions are based on the history, don’t forget to share one
History object between consecutive
prompt() calls.
Example:
from prompt_toolkit import prompt
from prompt_toolkit.history import InMemoryHistory
from prompt_toolkit.auto_suggest import AutoSuggestFromHistory

history = InMemoryHistory()

while True:
    text = prompt('> ', history=history, auto_suggest=AutoSuggestFromHistory())
    print('You said: %s' % text)
A suggestion does not have to come from the history. Any implementation of the
AutoSuggest abstract base class can be
passed as an argument.
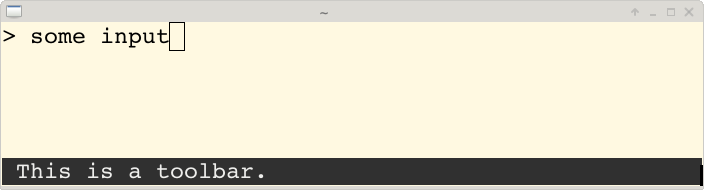
Adding a bottom toolbar
Adding a bottom toolbar is as easy as passing a get_bottom_toolbar_tokens
function to prompt(). The function is called
every time the prompt is rendered (at least on every key stroke), so the bottom
toolbar can be used to display dynamic information. It receives a
CommandLineInterface and should return a
list of tokens. The toolbar is always erased when the prompt returns.
from prompt_toolkit import prompt
from prompt_toolkit.styles import style_from_dict
from prompt_toolkit.token import Token

def get_bottom_toolbar_tokens(cli):
    return [(Token.Toolbar, ' This is a toolbar. ')]

style = style_from_dict({
    Token.Toolbar: '#ffffff bg:#333333',
})

text = prompt('> ', get_bottom_toolbar_tokens=get_bottom_toolbar_tokens,
              style=style)
print('You said: %s' % text)
The default token is Token.Toolbar and that will also be used to fill the
background of the toolbar. Styling can be done by pointing to
that token.
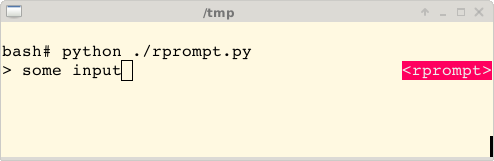
Adding a right prompt
The prompt() function has out of the box
support for right prompts as well. People familiar to ZSH could recognise this
as the RPROMPT option.
So, similar to adding a bottom toolbar, we can pass a get_rprompt_tokens
callable.
from prompt_toolkit import prompt
from prompt_toolkit.styles import style_from_dict
from prompt_toolkit.token import Token

example_style = style_from_dict({
    Token.RPrompt: 'bg:#ff0066 #ffffff',
})

def get_rprompt_tokens(cli):
    return [
        (Token, ' '),
        (Token.RPrompt, '<rprompt>'),
    ]

answer = prompt('> ', get_rprompt_tokens=get_rprompt_tokens,
                style=example_style)
Vi input mode
Prompt-toolkit supports both Emacs and Vi key bindings, similar to Readline.
The prompt() function will use Emacs bindings by
default. This is done because on most operating systems, also the Bash shell
uses Emacs bindings by default, and that is more intuitive. If however, Vi
binding are required, just pass vi_mode=True.
from prompt_toolkit import prompt

prompt('> ', vi_mode=True)
Adding custom key bindings
The prompt() function accepts an optional
key_bindings_registry argument. This should be
a Registry instance which hold
all of the key bindings.
It would be possible to create such a
Registry class ourself, but
usually, for a prompt, we would like to have at least the basic (Emacs/Vi)
bindings and start from there. That’s what the
KeyBindingManager class does.
An example of a prompt that prints 'hello world' when Control-T is pressed.
from prompt_toolkit import prompt
from prompt_toolkit.key_binding.manager import KeyBindingManager
from prompt_toolkit.keys import Keys

manager = KeyBindingManager.for_prompt()

@manager.registry.add_binding(Keys.ControlT)
def _(event):
    def print_hello():
        print('hello world')
    event.cli.run_in_terminal(print_hello)

text = prompt('> ', key_bindings_registry=manager.registry)
print('You said: %s' % text)
Note that we use
run_in_terminal(). This
ensures that the output of the print-statement and the prompt don’t mix up.
Enable key bindings according to a condition
Often, some key bindings can be enabled or disabled according to a certain condition. For instance, the Emacs and Vi bindings will never be active at the same time, but it is possible to switch between Emacs and Vi bindings at run time.
In order to enable a key binding according to a certain condition, we have to
pass it a CLIFilter, usually a
Condition instance. (Read more about
filters.)
from prompt_toolkit import prompt
from prompt_toolkit.filters import Condition
from prompt_toolkit.key_binding.manager import KeyBindingManager
from prompt_toolkit.keys import Keys

manager = KeyBindingManager.for_prompt()

def is_active(cli):
    " Only activate key binding on the second half of each minute. "
    return datetime.datetime.now().second > 30

@manager.registry.add_binding(Keys.ControlT, filter=Condition(is_active))
def _(event):
    # ...
    pass

prompt('> ', key_bindings_registry=manager.registry)
Dynamically switch between Emacs and Vi mode
The CommandLineInterface has
an editing_mode attribute. We can change the key bindings by changing this
attribute from EditingMode.VI to EditingMode.EMACS.
from prompt_toolkit import prompt
from prompt_toolkit.filters import Condition
from prompt_toolkit.key_binding.manager import KeyBindingManager
from prompt_toolkit.keys import Keys

def run():
    # Create a set of key bindings.
    manager = KeyBindingManager.for_prompt()

    # Add an additional key binding for toggling this flag.
    @manager.registry.add_binding(Keys.F4)
    def _(event):
        " Toggle between Emacs and Vi mode. "
        cli = event.cli

        if cli.editing_mode == EditingMode.VI:
            cli.editing_mode = EditingMode.EMACS
        else:
            cli.editing_mode = EditingMode.VI

    # Add a toolbar at the bottom to display the current input mode.
    def get_bottom_toolbar_tokens(cli):
        " Display the current input mode. "
        text = 'Vi' if cli.editing_mode == EditingMode.VI else 'Emacs'
        return [
            (Token.Toolbar, ' [F4] %s ' % text)
        ]

    prompt('> ', key_bindings_registry=manager.registry,
           get_bottom_toolbar_tokens=get_bottom_toolbar_tokens)

run()
Other prompt options
Multiline input
Reading multiline input is as easy as passing the multiline=True parameter.
from prompt_toolkit import prompt

prompt('> ', multiline=True)
A side effect of this is that the enter key will now insert a newline instead of accepting and returning the input. The user will now have to press Meta+Enter in order to accept the input. (Or Escape followed by Enter.)
It is possible to specify a continuation prompt. This works by passing a
get_continuation_tokens callable to prompt. This function can return a
list of (Token, text) tuples. The width of the returned text should not
exceed the given width. (The width of the prompt margin is defined by the
prompt.)
def get_continuation_tokens(cli, width):
    return [(Token, '.' * width)]

prompt('> ', multiline=True,
       get_continuation_tokens=get_continuation_tokens)
Passing a default
A default value can be given:
from prompt_toolkit import prompt
import getpass

prompt('What is your name: ', default='%s' % getpass.getuser())
Mouse support
There is limited mouse support for positioning the cursor, for scrolling (in case of large multiline inputs) and for clicking in the autocompletion menu.
Enabling can be done by passing the mouse_support=True option.
from prompt_toolkit import prompt
import getpass

prompt('What is your name: ', mouse_support=True)
Line wrapping
Line wrapping is enabled by default. This is what most people are used to and this is what GNU readline does. When it is disabled, the input string will scroll horizontally.
from prompt_toolkit import prompt
import getpass

prompt('What is your name: ', wrap_lines=False)
Password input
When the is_password=True flag has been given, the input is replaced by
asterisks (* characters).
from prompt_toolkit import prompt
import getpass

prompt('Enter password: ', is_password=True)
Prompt in an asyncio application
For asyncio applications,
it’s very important to never block the eventloop. However,
prompt() is blocking, and calling this would
freeze the whole application. A quick fix is to call this function via
the asyncio eventloop.run_in_executor, but that would cause the user
interface to run in another thread. (If we have custom key bindings for
instance, it would be better to run them in the same thread as the other code.)
The answer is to run the prompt_toolkit interface on top of the asyncio event
loop. Prompting the user for input is as simple as calling
prompt_async().
from prompt_toolkit import prompt_async

async def my_coroutine():
    while True:
        result = await prompt_async('Say something: ', patch_stdout=True)
        print('You said: %s' % result)
The patch_stdout=True parameter is optional, but it’s recommended, because
other coroutines could print to stdout. This option ensures that other output
won’t destroy the prompt.